How to add a sidebar to your Squarespace Website (Free & Premium)
This post may contain affiliate links. I may earn a commission at no extra cost to you if you make a purchase through them. Full disclosure here.
Adding a sidebar to your Squarespace site can enhance user experience by providing additional information, navigation options, or promotional content alongside your main content.
While Squarespace does not have a built-in sidebar feature in many of its templates, you can achieve this functionality through 2 Ways, including using plugins or creative workarounds.
This guide I will walk you through the steps to effectively add a sidebar to your Squarespace site.
Quick Fix
How to Add a Sidebar to Your Squarespace Site:
- Use a Sidebar Plugin: Purchase and install a sidebar plugin from Sqspthemes.com, then create a sidebar page and configure the plugin settings.
- Use Summary Blocks: Create a sidebar page, add Summary Blocks to display dynamic content, and embed this on your blog posts.
You Can Watch My Video
Methods to Add a Sidebar to Squarespace
Method 1: Using a Sidebar Plugin
One of the simplest ways to add a sidebar to your Squarespace site is by using a dedicated sidebar plugin. One recommended option is the Squarespace Sidebar Plugin from Sqspthemes.com.
Steps to Install the Sidebar Plugin
Purchase the Plugin:
Go to Sqspthemes.com and purchase the Sidebar Plugin. Choose the appropriate license based on your needs.
Download the Plugin Files:
Squarespace Sidebar Plugin files
After purchasing, download the plugin files to your computer.
Upload the Plugin Files:
Upload Squarespace Sidebar Plugin CSS & JS files
Log into your Squarespace account and navigate to Not Linked Section, Click on the + Icon And Click on Link.
Switch the type URL into File. Then
Upload plugin-sidebar.js and plugin-sidebar.css files.
Create a Sidebar Page:
In the Pages panel, create a new page under the Not Linked section and name it "Sidebar."
Add content to this page, such as images, links, or text that you want to appear in your sidebar.
Note: The sidebar page should not be disabled or password protected!
Configure the Plugin:
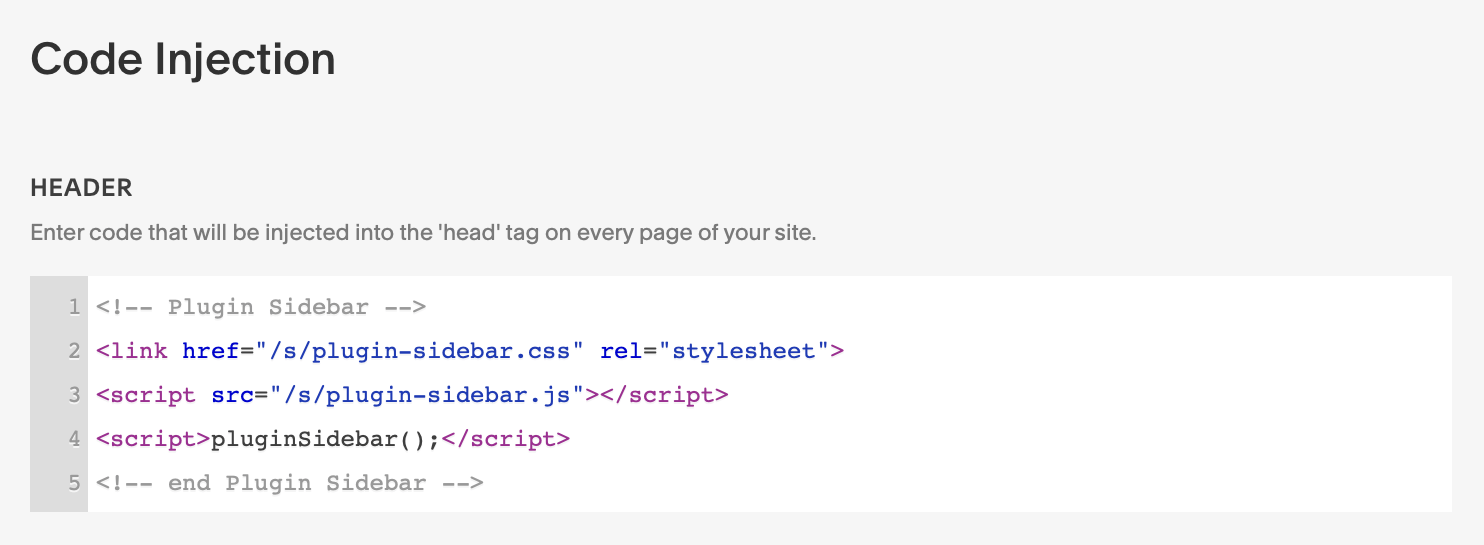
Add the code below to Code Injection - Header Field.
This typically involves adding a code snippet to your blog or page settings to link the sidebar page to your blog posts.
Customize Your Sidebar:
Use the plugin's settings to adjust the appearance of your sidebar, including width, padding, and background color.
Check My Video To Further Customize the Sidebar.
To Achieve The Sidebar you Must Have to Use Squarespace Business Plan.
Learn More about Squarespace Pricing & Squarespace Personal VS Business Plan
Method 2: Using Summary Blocks
If you prefer not to use a plugin, you can create a "fake" sidebar using Squarespace's built-in Summary Block feature. This method allows you to display content dynamically without the need for a plugin.
Steps to Create a Sidebar Using Summary Blocks
Create a New Page for Your Sidebar:
In the Pages panel, create a new page and name it "Sidebar." It Should be Blog.
Ensure this page is set to Not Linked to prevent it from appearing in your main navigation.
Add the content you want in your sidebar, such as text, images, or links
Add Sidebar Info to Each Articles:
On your Sidebar Blog Page, Add Each info to Each Article.
For Example, If you want to Show your Image, Add your Image into first Article Featured Area And add Some Little Description.
Add other info’s Like this Same Way to Each Articles.
Add Sidebar to Each Article:
Now Go to one of your Article and Add 2 Spacer. Make the spacer 18/6 Grid.
Add your Main Body Content under the 18 Grid.
Add Summery Block:
Now Add Summery Block to the 6 Column Grid.
Connect with your Sidebar and Adjust the styling options to match your site’s design..
Preview your blog posts to ensure the sidebar appears correctly. Make adjustments as needed to the content or layout.
Learn More About How to Customize Summary Block
Best Practices for Sidebar Content
Keep It Relevant: Ensure the content in your sidebar is relevant to the main content of the page or post.
Limit Clutter: Avoid overcrowding your sidebar with too much information. Focus on a few key elements that enhance user experience.
Monitor Engagement: Use analytics to track how users interact with your sidebar content. Adjust based on performance metrics.
Update Regularly: Keep your sidebar content fresh and up-to-date to encourage repeat visits and engagement.
Conclusion
Adding a sidebar to your Squarespace site can greatly enhance navigation and user engagement. Whether you choose to use a plugin, Summary Blocks, or custom code, the methods outlined in this guide provide effective solutions for creating a functional and visually appealing sidebar.
By following the steps and best practices detailed here, you can create a sidebar that complements your content and improves the overall user experience on your site.


